Spring Boot + PayPal 결제 구현

해당 포스팅은 PayPal 결제 테스트 환경인 PayPal sandbox를 사용하여 Spring Boot 프로젝트에서 PayPal Checkout API를 통한 결제 테스트를 구현해 보며 정리한 내용입니다.
전체 코드가 있는 github 주소는 포스팅 맨 하단에 링크되어 있으니 부족한 내용은 해당 링크를 참고해 주시면 좋을 것 같습니다.
(아래 구현된 부분은 전체 api 중 아주 일부분에 해당됩니다.)
결제 테스트에 필요한 부분


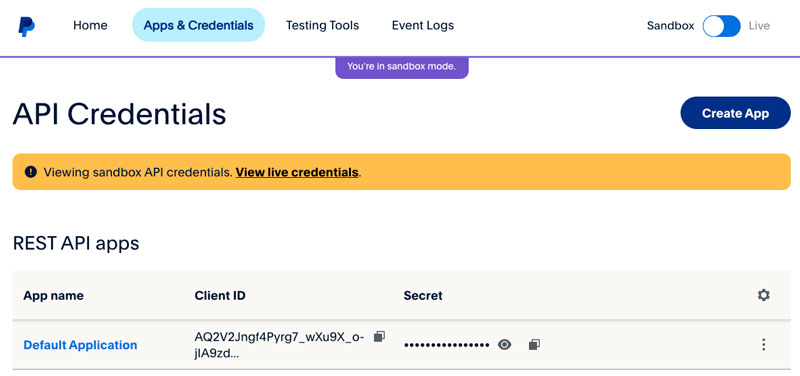
테스트에 앞서 필요한 것은 테스트를 위한 'PayPal 계정'이 필요하며, 해당 계정에서 생성한 'REST API apps', 'Sandbox text accounts'가 필요합니다.
***
test account의 View/Edit account 부분을 통해 해당 테스트 계정의 아이디와 비밀번호를 확인할 수 있으며, 해당 데이터를 가지고 코드 구현 이후 결제 테스트를 진행해 볼 수 있습니다.
(필요한 경우 test account를 추가로 생성할 수 있으며, 해당 테스트에서는 default 계정을 사용하였습니다.)
https://developer.paypal.com/home
(PayPal Developer 사이트)
Checkout api 결제 로직

Authentication (POST - /v1/oauth2/token)
Create order (POST - /v2/checkout/orders)
Show order details (GET - /v2/checkout/orders/{id})
아래 예시에서는 PayPal REST api 중 'Authentication', 'Create order' 두 가지 api가 사용되었으며, 포스팅 맨 하단 링크된 github의 전체 코드에서는 'Show order details' api를 사용한 예시도 확인할 수 있습니다.
Checkout api를 사용하는 전체 결제 로직의 경우 아래와 같습니다.
1. 구매자는 앱 서버에서 결제를 시작합니다.
2. 앱 서버에서는 clientId, secret을 포함하여 Authentication api를 호출합니다.
(이때 사용되는 clientId, secret은 REST API apps의 clientId, secret입니다.)
3. Authentication api 호출 결과로 access token을 받아옵니다.
4. 앱 서버에서는 access token 및 주문 정보를 포함하여 Create order api 호출을 통해 주문을 생성합니다.
5. 생성된 주문 결과를 앱 서버에서 받습니다.
6. 결제 승인을 위해 주문 결과 데이터 중 결제 승인 페이지를 구매자에게 리다이렉트 시켜줍니다.
7. 구매자는 계정 로그인 후 결제를 승인합니다.
8. 앱 서버에서는 결제에 대한 결과를 받습니다.
Spring Boot + PayPal 결제 코드 구현
- build.gradle
//build.gradle 중 dependencies 부분
dependencies {
	implementation 'org.springframework.boot:spring-boot-starter-web'
	compileOnly 'org.projectlombok:lombok'
	annotationProcessor 'org.projectlombok:lombok'
	testImplementation 'org.springframework.boot:spring-boot-starter-test'

	// https://mvnrepository.com/artifact/com.mysql/mysql-connector-j
	implementation group: 'com.mysql', name: 'mysql-connector-j', version: '8.0.33'
	// https://mvnrepository.com/artifact/org.springframework.boot/spring-boot-starter-data-jpa
	implementation group: 'org.springframework.boot', name: 'spring-boot-starter-data-jpa', version: '2.7.10'
	// https://mvnrepository.com/artifact/org.json/json
	implementation group: 'org.json', name: 'json', version: '20230227'
}
아래 예시에서는 paypal과 관련된 의존성을 따로 사용하지 않고 직접 구현한 'PaypalHttpClient'를 사용하여 통신합니다.
- application.yml, PaypalProperties
paypal:
  baseUrl: https://api-m.sandbox.paypal.com
  clientId: {REST API apps clientId}
  secret: {REST API apps secret}
(application.yml)
@Component
@Getter
@Setter
@ConfigurationProperties(prefix = "paypal")
public class PaypalProperties {

    private String baseUrl;
    private String clientId;
    private String secret;
}
(PaypalProperties class)
@ConfigurationProperties 어노테이션을 통해 application.yml 파일에 있는 property 값을 바인딩시키고 @Component 어노테이션을 통해 해당 클래스를 bean으로 등록합니다.
- Order Entity
@Data
@Entity
@Table(name = "orders")
public class Order {

    @Id
    @GeneratedValue(strategy = GenerationType.IDENTITY)
    private Long id;

    @Column(name = "paypal_order_id")
    private String paypalOrderId;

    @Column(name = "paypal_order_status")
    private String paypalOrderStatus;
}
(주문 정보를 저장하기 위한 Order Entity)
- PaypalEndpoints enum
public enum PaypalEndpoints {
    GET_ACCESS_TOKEN("/v1/oauth2/token"),
    GET_CLIENT_TOKEN("/v1/identity/generate-token"),
    ORDER_CHECKOUT("/v2/checkout/orders");

    private final String path;

    PaypalEndpoints(String path) {
        this.path = path;
    }

    public static String createUrl(String baseUrl, PaypalEndpoints endpoint) {
        return baseUrl + endpoint.path;
    }

    public static String createUrl(String baseUrl, PaypalEndpoints endpoint, String... params) {
        return baseUrl + endpoint.path + String.format("/%s", params);
    }
}
enum class를 통해 각 요청에 대한 endpoint를 정의합니다.(+ createUrl method)
- PaypalHttpClient
import static com.example.paypal.enums.PaypalEndpoints.*;

@Slf4j
@Component
public class PaypalHttpClient {

    private final HttpClient httpClient;
    private final PaypalProperties paypalProperties;
    private final ObjectMapper objectMapper;

    private static final String BEARER_TYPE = "Bearer ";

    @Autowired
    public PaypalHttpClient(PaypalProperties paypalProperties, ObjectMapper objectMapper) {
        this.paypalProperties = paypalProperties;
        this.objectMapper = objectMapper;
        httpClient = HttpClient.newBuilder().version(HttpClient.Version.HTTP_1_1).build();
    }

    public AccessTokenResponseDto getAccessToken() throws Exception {
        HttpRequest request = HttpRequest.newBuilder()
                .uri(URI.create(createUrl(paypalProperties.getBaseUrl(), GET_ACCESS_TOKEN)))
                .header(HttpHeaders.ACCEPT, MediaType.APPLICATION_JSON_VALUE)
                .header(HttpHeaders.AUTHORIZATION, encodeBasicCredentials())
                .header(HttpHeaders.ACCEPT_LANGUAGE, "en_US")
                .header(HttpHeaders.CONTENT_TYPE, MediaType.APPLICATION_FORM_URLENCODED_VALUE)
                .POST(HttpRequest.BodyPublishers.ofString("grant_type=client_credentials"))
                .build();

        HttpResponse<String> response = httpClient.send(request, HttpResponse.BodyHandlers.ofString());
        String content = response.body();

        return objectMapper.readValue(content, AccessTokenResponseDto.class);
    }

    public CreateOrderResponseDto createOrder(OrderDto orderDto) throws Exception {
        AccessTokenResponseDto accessTokenDto = getAccessToken();
        String payload = objectMapper.writeValueAsString(orderDto);

        HttpRequest request = HttpRequest.newBuilder()
                .uri(URI.create(createUrl(paypalProperties.getBaseUrl(), ORDER_CHECKOUT)))
                .header(HttpHeaders.CONTENT_TYPE, MediaType.APPLICATION_JSON_VALUE)
                .header(HttpHeaders.AUTHORIZATION, BEARER_TYPE + accessTokenDto.getAccessToken())
                .POST(HttpRequest.BodyPublishers.ofString(payload))
                .build();

        HttpResponse<String> response = httpClient.send(request, HttpResponse.BodyHandlers.ofString());
        String content = response.body();

        return objectMapper.readValue(content, CreateOrderResponseDto.class);
    }

    private String encodeBasicCredentials() {
        String input = paypalProperties.getClientId() + ":" + paypalProperties.getSecret();
        return "Basic " + Base64.getEncoder().encodeToString(input.getBytes(StandardCharsets.UTF_8));
    }
}
직접 구현한 PaypalHttpClient class에서는 내부적으로 'java.net.http.HttpClient'를 사용하여 통신하는데요.
getAccessToken() 메서드를 통해 Authentication api(/v1/oauth2/token)를 호출하여 access token을 가져오고, createOrder() 메서드에서는 access token 및 주문 데이터를 가지고 Create order api(/v2/checkout/orders)를 호출합니다.
- CheckoutController
@Slf4j
@RequestMapping("/checkout")
@RequiredArgsConstructor
@Controller
public class CheckoutController {

    private final PaypalHttpClient paypalHttpClient;
    private final OrderRepository orderRepository;

    @PostMapping
    public ResponseEntity<CreateOrderResponseDto> checkout(@RequestBody OrderDto orderDto) throws Exception {
        PaypalAppContextDto appContext = new PaypalAppContextDto();
        appContext.setReturnUrl("http://localhost:8083/checkout/success");
        appContext.setBrandName("jan92");
        appContext.setLandingPage(PaymentLandingPage.BILLING);
        orderDto.setApplicationContext(appContext);
        CreateOrderResponseDto orderResponse = paypalHttpClient.createOrder(orderDto);

        Order order = new Order();
        order.setPaypalOrderId(orderResponse.getId());
        order.setPaypalOrderStatus(orderResponse.getStatus().toString());
        orderRepository.save(order);

        return ResponseEntity.ok(orderResponse);
    }

    @GetMapping("/success")
    public ResponseEntity<?> paymentSuccess(HttpServletRequest request) {
        String orderId = request.getParameter("token");
        Order targetOrder = orderRepository.findByPaypalOrderId(orderId);
        targetOrder.setPaypalOrderStatus(OrderStatus.APPROVED.toString());
        orderRepository.save(targetOrder);

        return ResponseEntity.ok().body("Payment success");
    }
}
(CheckoutController)
결제 테스트

***
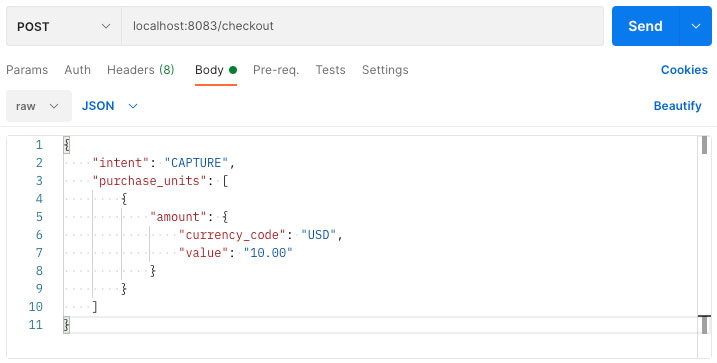
아래 공식 문서의 요청 Payload를 살펴보면 purchase_units에는 amount 외에도 여러 데이터가 들어가는 것을 확인할 수 있는데요.
해당 예시에서는 결제 동작을 목표로 최대한 간단하게 구현되었다는 점을 참고 부탁드립니다.
https://developer.paypal.com/docs/api/orders/v2/#orders_create
(Create order api docs)
{
    "id": "XXXXXXXXXXXXXXXXX",
    "status": "CREATED",
    "links": [
        {
            "href": "https://api.sandbox.paypal.com/v2/checkout/orders/XXXXXXXXXXXXXXXXX",
            "rel": "self",
            "method": "GET"
        },
        {
            "href": "https://www.sandbox.paypal.com/checkoutnow?token=XXXXXXXXXXXXXXXXX",
            "rel": "approve",
            "method": "GET"
        },
        {
            "href": "https://api.sandbox.paypal.com/v2/checkout/orders/XXXXXXXXXXXXXXXXX",
            "rel": "update",
            "method": "PATCH"
        },
        {
            "href": "https://api.sandbox.paypal.com/v2/checkout/orders/XXXXXXXXXXXXXXXXX/capture",
            "rel": "capture",
            "method": "POST"
        }
    ]
}
위 결제 테스트의 요청 결과로 다음과 같은 데이터를 얻을 수 있는데요. ("status": "CREATED")
"rel": "approve"에 해당하는 링크로 사용자를 이동시키면 아래와 같이 사용자가 결제할 수 있는 페이지가 나오게 됩니다.

사용자는 해당 페이지에서 로그인 후 결제를 완료할 수 있습니다.
(실제로 결제까지 요청해보고 싶은 경우 위에서 생성한 test account를 통해 로그인하여 결제를 진행할 수 있습니다.)
< 참고 자료 >
https://bitshifted.co/blog/spring-boot-paypal-integration/
https://developer.paypal.com/api/rest/
https://blog.devgenius.io/paypal-integration-with-spring-boot-f1e297d76336
< 전체 코드 github 주소 >
'Programming > Spring Boot' 카테고리의 다른 글
| JPA 연관 관계 매핑 - 조인 테이블(@JoinTable) 개념과 적용 방법 (0) | 2023.06.21 |
|---|---|
| Redisson 분산락을 사용하는 이유와 기본적인 사용 방법 (1) | 2023.06.17 |
| RedisHash 사용 시 @Indexed 필드 TTL(timeToLive) 적용 안되는 문제 (0) | 2023.05.26 |
| 양방향 매핑 순환참조 문제 Cannot call sendError() after the response has been committed (0) | 2023.04.28 |
| N+1 문제를 해결하기 위한 FetchJoin, 일반 Join과의 차이점은 (0) | 2023.04.22 |