
Session을 사용한 아주 기본적인 스프링 시큐리티 코드를 정리한 내용입니다.
최근 WebSecurityConfigurerAdapter가 deprecated 되면서 해당 부분이 적용된 코드로 구현하였으며, 세부적인 내용을 모두 담기에는 길어지기 때문에 전체적인 큰 흐름에서 참고해주시면 좋을 것 같습니다.
(전체 코드는 포스팅 맨 하단 git 주소를 링크해두었고, spring security 흐름에 참고가 될만한 글도 함께 링크해 두었으니 보시면 좋을 것 같습니다.)
Spring Security란?
대부분의 프로그램에서는 사용자에 대한 기능이 필수적으로 들어가는데요. 사용자 기능이 들어가면 인증(Authentication)과 인가(Authorization)에 대한 처리 역시 함께 들어가야 하는데, Spring을 사용하는 경우 Spring Security라는 프레임워크를 통해 애플리케이션에 대한 인증, 권한 등의 보안 기능을 손쉽게 구현할 수 있습니다.
(Session, OAuth2, JWT 등의 로그인 방법이 구현되어 있으며, 수정과 확장을 통해 필요한 환경에 맞게 사용할 수 있습니다.)
Entity(User, Role, Privilege) 연관관계
@Entity
@Builder
@Getter
@AllArgsConstructor
@NoArgsConstructor
@Table(name = "users")
public class User {

    @Id
    @GeneratedValue(strategy = GenerationType.IDENTITY)
    @Column(name = "id", unique = true, nullable = false)
    private Long id;

    private String email;

    private String password;

    @ManyToMany(fetch = FetchType.EAGER)
    @JoinTable(
            name = "users_roles",
            joinColumns = {@JoinColumn(name = "user_id", referencedColumnName = "id")},
            inverseJoinColumns = {@JoinColumn(name = "role_id", referencedColumnName = "id")}
    )
    private Collection<Role> roles;
}
(User Class)
@Entity
@Getter
@Setter
@Table(name = "roles")
public class Role {

    @Id
    @GeneratedValue(strategy = GenerationType.IDENTITY)
    @Column(name = "id", nullable = false)
    private Long id;

    private String name;

    @ManyToMany(mappedBy = "roles")
    private Collection<User> users;

    @ManyToMany(fetch = FetchType.EAGER)
    @JoinTable(
            name = "roles_privileges",
            joinColumns = @JoinColumn(name = "role_id", referencedColumnName = "id"),
            inverseJoinColumns = @JoinColumn(name = "privilege_id", referencedColumnName = "id")
    )
    private Collection<Privilege> privileges;

    public Role() {
        super();
    }

    public Role(final String name) {
        this.name = name;
    }
}
(Role Class)
@Entity
@Getter
@NoArgsConstructor
@Table(name = "privileges")
public class Privilege {

    @Id
    @GeneratedValue(strategy = GenerationType.IDENTITY)
    @Column(name = "id", nullable = false)
    private Long id;

    private String name;

    @ManyToMany(mappedBy = "privileges")
    private Collection<Role> roles;

    public Privilege(final String name) {
        super();
        this.name = name;
    }
}
(Privilege Class)
Entity는 다음과 같이 User, Role, Privilege(사용자, 역할, 권한) 세 개의 클래스를 사용하였고, 이들은 서로 간에 다대다(Many To Many)의 관계로 이루어져 있습니다.
(권한 Privilege의 경우 각 역할 Role에서 세분화된 권한을 나타냅니다.)
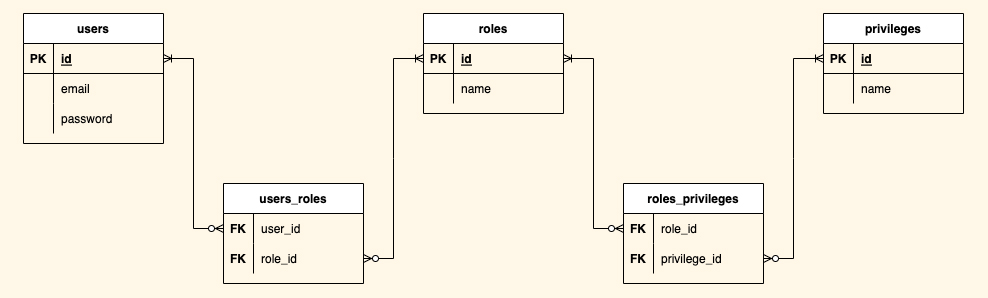
Entity는 3개이지만, 다대다 관계로 인해 DB의 테이블은 다음과 같이 총 5개를 가지게 됩니다.
SetupDataLoader
public class SetupDataLoader implements ApplicationListener<ContextRefreshedEvent> {
    ....
}
아래 전체 코드 git 주소를 통해 spring 패키지 하위에 있는 SetupDataLoader 클래스를 볼 수 있는데요.
해당 클래스는 ContextRefreshedEvent라는 이벤트를 타입으로 한 ApplicationListener에 의해 서버 시작 시 초기 데이터를 로드하는 역할을 합니다.
(해당 클래스를 통해 기본적으로 사용될 Role 및 Privilege를 세팅할 수 있습니다.)
WebSecurityConfigure
Spring Security 설정의 핵심이 되는 클래스입니다. (해당 클래스의 전체 코드를 한 번에 올리면 너무 길어지기 때문에 번거롭더라도 부분 부분 살펴보겠습니다.)
    @Bean
    public WebSecurityCustomizer webSecurityCustomizer() {
        return (web -> web.ignoring().requestMatchers(PathRequest.toStaticResources().atCommonLocations()));
    }

    @Bean
    public BCryptPasswordEncoder passwordEncoder() {
        return new BCryptPasswordEncoder();
    }
먼저 위에 빈으로 등록한 WebSecurityCustomizer를 통해 staticResources에 대한 security ignoring 처리를 할 수 있습니다.
(코드를 따라가 보면 StaticResourceLocation이라는 enum 파일에 등록된 static resource들의 path를 가져올 수 있습니다.)
다음으로 PasswordEncoder는 BCryptPasswordEncoder를 빈 등록하여 사용합니다.
@SecurityFilterChain
    @Bean
    public SecurityFilterChain filterChain(HttpSecurity http) throws Exception {
        http

        ....

        return http.build();
    }
해당 부분이 최근에 WebSecurityConfigurerAdapter가 deprecated 되면서 바뀐 가장 큰 부분인데요.
(HttpSecurity 설정에 대한 세부 내용은 아래에 이어서 설명됩니다.)
@Configuration
public class WebSecurityConfigure extends WebSecurityConfigurerAdapter {

    ...

    @Override
    protected void configure(HttpSecurity http) throws Exception {
        ...
    }
}
기존에는 WebSecurityConfigurerAdapter를 extends 해서 configure() 메서드를 오버라이딩하여 사용했었는데요.
앞으로는 SecurityFilterChain을 Bean으로 등록해서 사용하는 방법이 권장됩니다.
    @Bean
    public SecurityFilterChain filterChain(HttpSecurity http) throws Exception {
        http
                .csrf().disable();

//        http
//            .authorizeRequests()
//            .antMatchers("/home").permitAll()
//            .antMatchers("/user").hasAnyRole("USER", "ADMIN")
//            .antMatchers("/admin").hasAnyRole("ADMIN")
//            .anyRequest().authenticated();

        http
                .authorizeHttpRequests()
                .antMatchers("/**").permitAll();

        http
                .formLogin()
//        .loginPage("/customLoginPage")
                .defaultSuccessUrl("/home")
                .failureUrl("/login?error=true")
//        .successHandler(successHandler())
//        .failureHandler(failureHandler())
                .usernameParameter("email")
                .passwordParameter("password");

        http
                .logout()
                .logoutRequestMatcher(new AntPathRequestMatcher("/logout"))
                .logoutSuccessUrl("/login");

        http
                .sessionManagement()
                .maximumSessions(1)
                .maxSessionsPreventsLogin(true)
                .expiredUrl("/expired");

        return http.build();
    }
다시 SecurityFilterChain입니다.
먼저 주석 처리된 .authorizeRequests() ~ 부분을 살펴보면, 해당 부분을 통해 요청에 대한 권한 설정을 할 수 있는데요.
.permitAll()의 경우 해당 url에 대한 인증 정보를 요구하지 않는다는 것이며, .hasAnyRole()을 통해 해당 url에 대한 역할 정보를 요구하게 됩니다. .authenticated()는 인증은 요구하지만 인가는 요구하지 않는다는 설정입니다.
* 인증 - 해당 사용자가 본인이 맞는지 확인하는 절차
* 인가 - 인증된 사용자가 요청한 자원에 접근 가능한지를 결정하는 절차
이러한 방식으로 요청 권한을 설정할 수 있지만, 주석처리를 하고 모든 요청을 허용으로 설정한 이유는 아래 컨트롤러 단에서 확인할 수 있는데요. 이유를 먼저 이야기하면, 컨트롤러에서 @PreAuthorize() 어노테이션을 통해 권한 설정을 하기 위해서인데, 해당 내용은 아래에서 다시 살펴보겠습니다.
다음은 로그인폼 관련 설정 부분입니다.
.formLogin()을 통해 Form 기능이 작동하게 되며, .loginPage()를 통해 사용자가 원하는 로그인 페이지를 설정할 수 있습니다.
해당 페이지를 설정하지 않으면 spring security에서 구현한 디폴트 화면이 노출됩니다.
.defaultSuccessUrl()를 통해 로그인에 성공한 인증된 사용자일 경우 로그인 후 이동할 페이지를 설정할 수 있습니다.
.failureUrl()은 반대로 로그인 실패일 경우 이동할 페이지를 설정할 수 있습니다.
.successHandler(), .failureHandler() 같은 경우는 .defaultSuccessUrl(), .failureUrl()이 페이지만 설정하는 것과는 다르게, 조금 더 세부적인 작업을 해야 할 경우 추가되는 부분입니다.
다음으로 세션 관련 설정인데요.
.maximumSessions()를 통해 최대 허용 가능 세션 수를 설정할 수 있고, .maxSessionsPreventsLogin()을 통해서는 허용 가능한 세션의 수가 되었을 때, 추가적인 인증이 있을 경우 어떻게 처리할 것인지를 설정하는 기능입니다.
true일 경우 현재 요청하는 사용자의 인증을 실패시키고, false인 경우 기존에 인증된 세션을 만료하게 됩니다.
.expireUrl()는 세션이 만료된 경우 이동할 페이지를 설정할 수 있습니다.
* 이렇게 세션을 설정하고 사용할 때, 로그아웃 후 해당 아이디로 다시 로그인을 하게 되면 Session에 인증 정보가 남아있어서 로그인이 안 되는 상황이 발생할 수 있습니다.
    @Bean
    public static ServletListenerRegistrationBean httpSessionEventPublisher() {
        return new ServletListenerRegistrationBean(new HttpSessionEventPublisher());
    }
그럴 경우 ServletListenerRegistrationBean을 등록하게 되면 해당 문제가 발생하지 않습니다.
RoleHierarchy
    @Bean
    public RoleHierarchy roleHierarchy() {
        RoleHierarchyImpl roleHierarchy = new RoleHierarchyImpl();
        String hierarchy = "ROLE_ADMIN > ROLE_USER";
        roleHierarchy.setHierarchy(hierarchy);

        return roleHierarchy;
    }

    @Bean
    public DefaultWebSecurityExpressionHandler webSecurityExpressionHandler() {
        DefaultWebSecurityExpressionHandler expressionHandler = new DefaultWebSecurityExpressionHandler();
        expressionHandler.setRoleHierarchy(roleHierarchy());
        return expressionHandler;
    }
RoleHierarchy는 역할의 관계를 설정하기 위한 부분입니다.
다음과 같이 ROLE_ADMIN > ROLE_USER로 설정하게 되면, 인가 처리 부분에서 ADMIN ROLE을 가진 사용자는 USER ROLE만 설정된 부분에도 접근할 수 있게 됩니다.
Controller
@Controller
@RequiredArgsConstructor
public class UserController {

    @PreAuthorize("hasRole('USER')")
    @GetMapping("/user")
    public String user() {
        return "/user";
    }

    @PreAuthorize("hasRole('ADMIN')")
    @GetMapping("/admin")
    public String admin() {
        return "/admin";
    }

    @PreAuthorize("hasAnyAuthority('READ_PRIVILEGE','WRITE_PRIVILEGE')")
    @GetMapping("/read")
    public String read() {
        return "/read";
    }
}
Controller 부분입니다.
@PreAuthorize 어노테이션을 통해 예시와 같이 Role 또는 Authority(Privilege) 권한을 설정할 수 있는데요.
@Configuration
@EnableGlobalMethodSecurity(securedEnabled = true, prePostEnabled = true, jsr250Enabled = true)
public class MethodSecurity {

}
@PreAuthorize 어노테이션을 사용하기 위해서는 @EnableGlobalMethodSecurity 어노테이션을 적용해줘야 합니다.
@EnableGlobalMethodSecurity는 securedEnabled, prePostEnabled, jsr250Enabled 세 가지 속성을 가지고 있는데요.
securedEnabled 같은 경우는 @Secured 어노테이션을 사용하여 인가를 처리하고 싶을 때 설정하는 것이며, prePostEnabled는 @PreAuthorize, @PostAuthorize 어노테이션으로 인가 처리를 할 때 설정합니다.
마지막으로 jsr250Enabled 속성은 @RolesAllowed 어노테이션을 사용하여 인가 처리를 하고 싶을 때 사용하는 것입니다.
긴 내용으로 인해 간단하게 설명된 부분이 많습니다. 자세한 코드는 아래 git 주소를 참고해주시고, Security 흐름에 관련된 함께 보면 좋은 포스팅들도 링크해두겠습니다.
잘못된 부분이나, 궁금하신 부분은 댓글 남겨주시면 답변드리겠습니다. 감사합니다.
< GitHub >
GitHub - JianChoi-Kor/BasicSecurity: Basic Security
Basic Security. Contribute to JianChoi-Kor/BasicSecurity development by creating an account on GitHub.
github.com
< Security 관련 자료 >
Spring Security 시큐리티 동작 원리 이해하기 - 1
스프링 시큐리티 (Spring Security)는 스프링 기반 어플리케이션의 보안(인증과 권한, 인가)을 담당하는 스프링 하위 프레임워크입니다. 보안과 관련해서 체계적으로 많은 옵션들을 제공해주기 때문
wildeveloperetrain.tistory.com
spring security + JWT 로그인 기능 파헤치기 - 1
로그인 기능은 거의 대부분의 애플리케이션에서 기본적으로 사용됩니다. 추가로 요즘은 웹이 아닌 모바일에서도 사용 가능하다는 장점과 Stateless 한 서버 구현을 위해 JWT를 사용하는 경우를 많
wildeveloperetrain.tistory.com
'Programming > Spring Boot' 카테고리의 다른 글
| FeignClient 기본적인 사용법 (Spring Cloud OpenFeign) (0) | 2022.08.12 |
|---|---|
| ExceptionTranslationFilter과 SecurityInterceptor (0) | 2022.08.01 |
| 스프링 시큐리티 SecurityContextHolder에 Authentication(인증) 정보가 저장되는 과정 (0) | 2022.07.13 |
| @Valid @Validated 동작 원리 파헤치기 (4) | 2022.07.01 |
| (Spring Boot) Custom Validator 적용하는 방법, 단일 및 다중 필드 (3) | 2022.06.29 |