
타임리프(Thymeleaf)에 대해서 간단하게,
타임리프는 서버 사이드 템플릿 엔진(Template Engine)의 한 종류로, 쉽게 컨트롤러가 전달하는 데이터를 이용하여 동적으로 화면을 구성할 수 있게 해주는 역할을 합니다.
타임리프(Thymeleaf)는 HTML의 속성(Attribute)을 기반으로 작동되기 때문에 기존의 HTML 구조를 건드리지 않고 동작합니다.
때문에 서버를 구동하지 않을 때는 순수 HTML을 생성하며, 서버를 구동했을 때는 동적 HTML을 생성하게 됩니다.
'th:속성' 형식을 통해 값을 치환해주는 방법이 적용되며, 순수 HTML을 기반으로 하기 때문에 내추럴 템플릿으로도 불립니다.
(추가로 Spring에서 공식적으로 Thymeleaf 사용을 권장하고 있습니다.)
레이아웃을 사용하는 이유
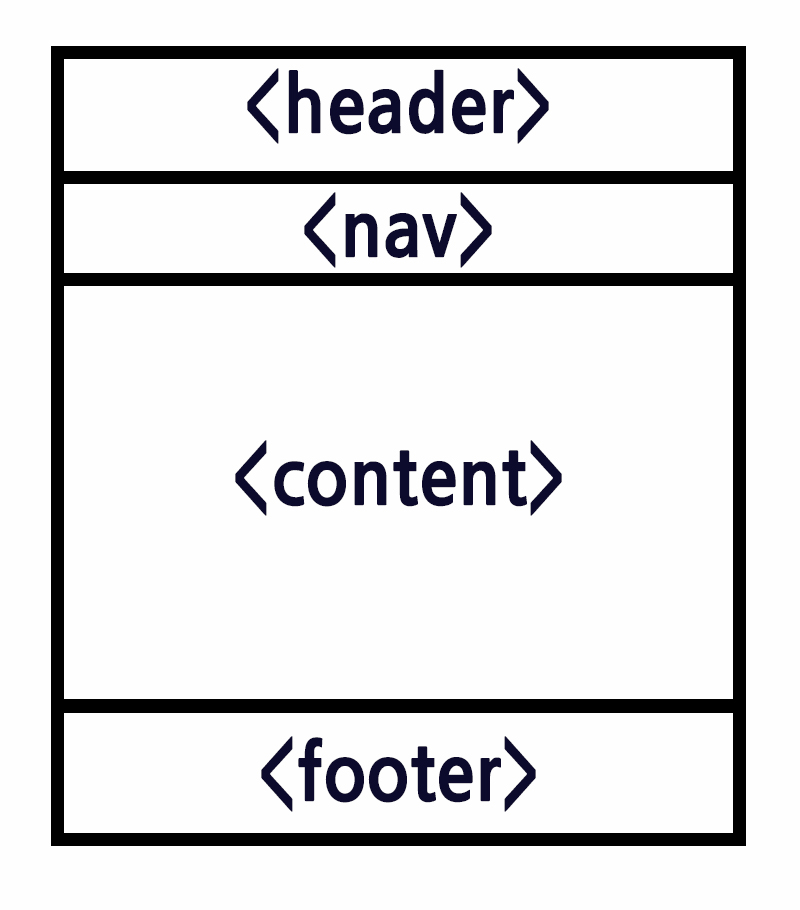
레이아웃을 사용하는 이유는 간단합니다. header와 footer가 고정적으로 들어가는 웹에서 각각의 page 마다 header, footer를 복사해서 넣어주는 것은 효율적이지 않기 때문에, 반복되는 HTML 코드를 줄이기 위해서 layout을 사용하게 됩니다.
Dependency
<dependency>
    <groupId>org.springframework.boot</groupId>
    <artifactId>spring-boot-starter-thymeleaf</artifactId>
</dependency>
<dependency>
    <groupId>nz.net.ultraq.thymeleaf</groupId>
    <artifactId>thymeleaf-layout-dialect</artifactId>
</dependency>
layout 적용을 위해서는 기존의 'spring-boot-starter-thyeleaf' 외에 추가로 'thymeleaf-layout-dialect'를 추가해줘야 합니다.
# thymeleaf
spring.thymeleaf.prefix=classpath:templates/
spring.thymeleaf.suffix=.html
spring.thymeleaf.cache=false
(.properties)
* 예시에서 적용된 버전

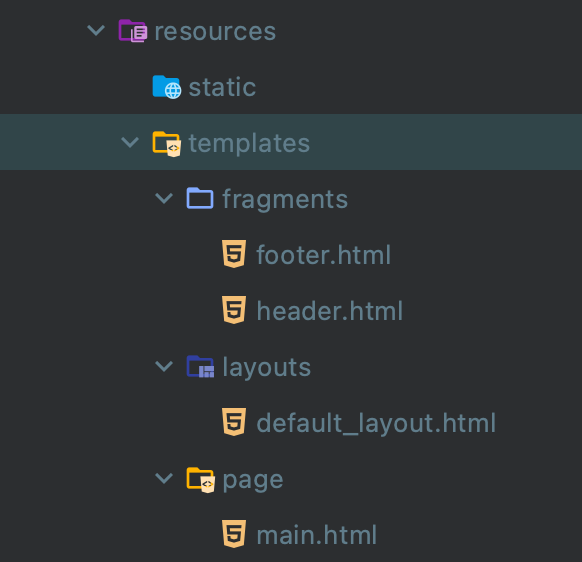
프로젝트 구조와 적용 원리
fragments directory에는 레이아웃에서 공통적으로 쓸 부분들의 html 코드를 생성합니다.
layouts directory의 default_layout.html에는 공통적으로 쓸 header, footer 같은 부분을 적용 및 전체 layout 구조를 세팅하고, page directory는 실제 각각의 page에서는 페이지별로 다른 부분인 content가 적용됩니다.
fragments
<html lagn="ko" xmlns:th="http://www.thymeleaf.org">
<!--headerFragment 선언-->
<div th:fragment="headerFragment">
    <h1>Header Section</h1>
</div>
</html>
header.html
<html lagn="ko" xmlns:th="http://www.thymeleaf.org">
<!--footerFragment 선언-->
<div th:fragment="footerFragment">
    <h1>Footer Section</h1>
</div>
</html>
footer.html
xmlns:th="http://www.thymeleaf.org"
=> Thymeleaf를 사용한다는 선언으로 html 태그에 xmlns:th="http://www.thymeleaf.org"를 추가합니다.
th:fragment="fragment명"
=> th:fragment는 해당 부분을 fragment로 선언한다는 의미입니다.
layout
<!DOCTYPE html>
<html lagn="ko"
      xmlns:th="http://www.thymeleaf.org"
      xmlns:layout="http://www.ultraq.net.nz/thymeleaf/layout">
<head>
    <meta charset="UTF-8" />
    <title>thymeleaf layout</title>
    <meta name="viewport" content="width=device-width, maximum-scale=1.0, minimum-scale=1, user-scalable=yes,initial-scale=1.0" />
    <!-- content script -->
    <th:block layout:fragment="css"></th:block>
    <!-- content script -->
    <th:block layout:fragment="script"></th:block>
</head>
<body>
    <!-- header fragment 사용 -->
    <th:block th:replace="fragments/header :: headerFragment"></th:block>
    <!-- content fragment 사용 -->
    <th:block layout:fragment="content"></th:block>
    <!-- footer fragment 사용 -->
    <th:block th:replace="fragments/footer :: footerFragment"></th:block>
</body>
</html>
default_layout.html 파일에서는 html에 xmlns:layout="http://www.ultraq.net.nz/thymeleaf/layout"를 추가합니다.
<th:block layout:fragment="css"></th:block>
<th:block layout:fragment="script"></th:block>
=> 각각의 content에서만 적용되는 css, js가 이 부분에서 적용되며,
<th:block th:replace="fragments/header :: headerFragment"></th:block>
<th:block th:replace="fragments/footer :: footerFragment"></th:block>
=> th:replace="fragment 위치 :: fragment명"을 호출하여 fragment를 불러올 수 있습니다.
(th:replace는 해당 태그 부분을 fragment로 선언한 코드로 바꾼다는 의미입니다.)
page
<!DOCTYPE html>
<html xmlns="http://www.w3.org/1999/xhtml"
      xmlns:th="http://www.thymeleaf.org"
      xmlns:layout="http://www.ultraq.net.nz/thymeleaf/layout"
      layout:decorate="~{layouts/default_layout}">

<!-- index.html 고유 CSS 추가 -->
<th:block layout:fragment="css">
    <!--    <link rel="stylesheet" th:href="@{/css/page/home.css}" >-->
</th:block>
<!-- index.html 고유 스크립트 추가 -->
<th:block layout:fragment="script">
    <!--    <script th:src="@{/js/page/home.js}"></script>-->
</th:block>

<!-- Content -->
<div layout:fragment="content">
    <h1>Content</h1>
</div>
</html>
각각의 content에는 html에 layout:decorate="~{layouts/default_layout}"가 추가되어야 합니다.
<th:block layout:fragment="css">
<th:block layout:fragment="script">
<div layout:fragment="content">
=> 부분을 통해 각각의 페이지에서 적용되는 css, js와 페이지의 content를 적용하게 됩니다.

Controller에서 ModelAndView를 통해 main page로 연결하고 layout이 적용이 된 모습입니다.
'Programming > Spring Boot' 카테고리의 다른 글
| Spring Batch 개념과 구조, 동작 방식에 대한 정리 (0) | 2022.03.15 |
|---|---|
| Redis 동시성 처리를 위한 Transaction 사용 (MULTI, EXEC, DISCARD, WATCH) (2) | 2022.03.05 |
| Querydsl Paging 페이징 처리, Custom PageRequest 사용하는 이유 (0) | 2022.02.28 |
| DB 트래픽 분산을 위한 DataSource Read, Write 분기 처리 (0) | 2022.02.08 |
| SELECT FOR UPDATE / JPA를 사용한 비관적 잠금 (0) | 2022.02.06 |