(eclipse) Spring MVC Project 수동 생성 과정 정리
이클립스 Spring MVC Project 수동 생성 과정 정리

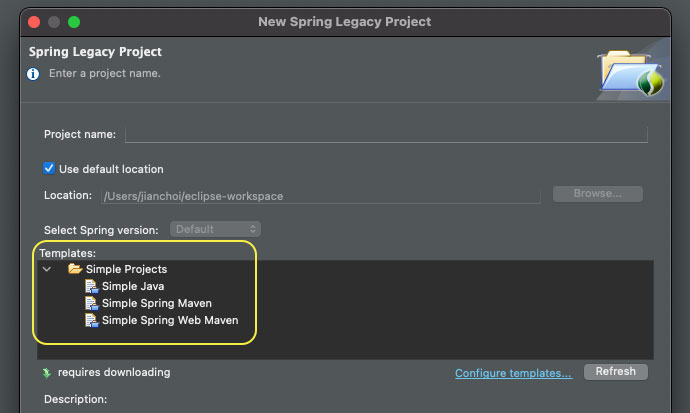
이클립스 환경에서 'Oracle JDK 11' + 'STS3(Spring Tools 3 Add-On for Spring Tools)'를 설치한 상태로 'Spring MVC Project'를 생성하려고 했으나, 구글링을 통해 관련된 해결책을 모두 시도해 보았음에도 불구하고 Templates에서 'Spring MVC Project'를 찾을 수 없었습니다.
(STS 자체를 설치하여 실행해도 해당 템플릿이 나오지 않았습니다.)
eclipse 버전을 낮춰보려고 하다가 프로젝트 구조도 다시 익힐 겸 'Spring MVC Project'를 수동으로 생성하였으며, 그 과정을 정리하였습니다.
(아래 과정은 'eclipse 2022-03' 및 'Spring Tools 3 3.9.14.RELEASE' 환경에서 진행되었습니다.)
0. Spring MVC Project Template
'Spring MVC Project Template'은 Spring MVC 애플리케이션을 빠르게 구축하고 시작할 수 있도록 미리 구성된 프로젝트 구조와 설정을 제공하는 템플릿으로, 전체적인 '프로젝트 구조'와 Spring MVC 프로젝트에 사용되는 필수적인 '라이브러리 의존성', 'web.xml', 'Spring 설정 파일' 등으로 구성되어 있습니다.
1. Dynamic Web Project 생성

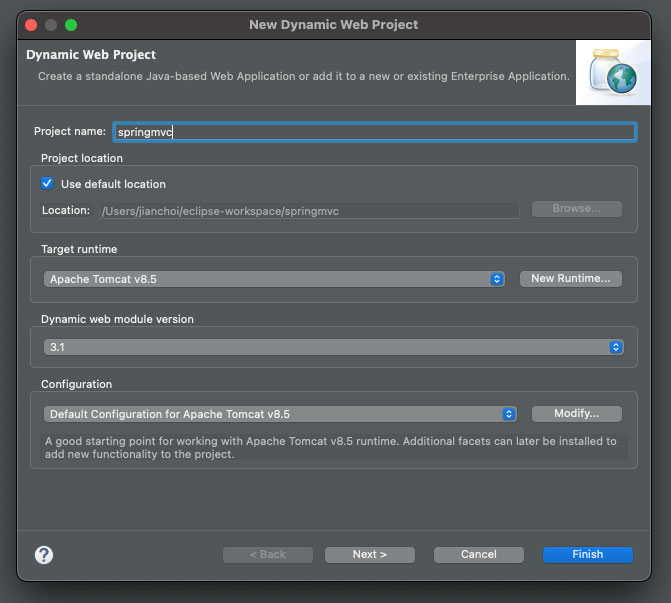
먼저 'Dynamic Web Project'를 생성합니다.
생성 과정에서는 'New Runtime...' 버튼을 통해 사용할 톰캣 버전과 해당 버전이 설치된 경로(Tomcat installation directory)를 설정해 주면 Target runtime이 지정되고, 해당 runtime에 맞는 'Dynamic web module version', 'Configuration'이 자동으로 설정됩니다.
2. Convert to Maven Project (+ 스프링 프레임워크 의존성 추가)

이어서 생성된 프로젝트를 'Maven Project'로 변경합니다.
'Maven'은 프로젝트의 전체적인 라이프 사이클 및 라이브러리들을 관리하는 도구이며, 필요한 라이브러리를 pom.xml 파일을 통해 지정하고, 또 자동으로 다운로드할 수 있습니다.
협업 과정에서 'pom.xml' 파일이 공유되기 때문에 팀원들이 동일한 개발 환경(라이브러리)에서 작업이 가능합니다.
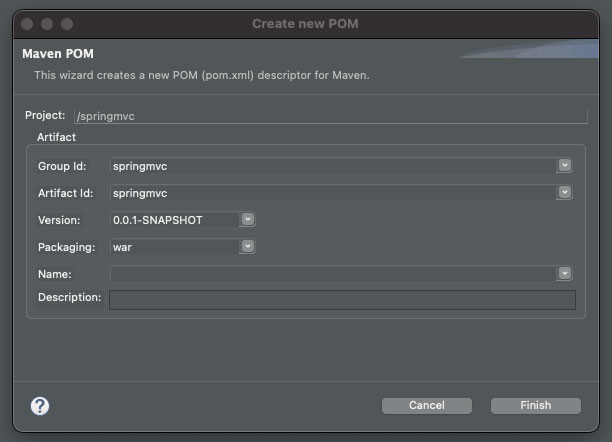
변경 방법은 '프로젝트 우클릭' -> 'configure' -> 'Convert to Maven Project'를 실행하면 위 이미지와 같은 'Create new POM'이 나오며, 생성을 완료하면 프로젝트 경로 맨 하단에 'pom.xml' 파일이 생성됩니다.
<project xmlns="http://maven.apache.org/POM/4.0.0" xmlns:xsi="http://www.w3.org/2001/XMLSchema-instance" xsi:schemaLocation="http://maven.apache.org/POM/4.0.0 https://maven.apache.org/xsd/maven-4.0.0.xsd">
	<modelVersion>4.0.0</modelVersion>
	<groupId>springmvc</groupId>
	<artifactId>springmvc</artifactId>
	<version>0.0.1-SNAPSHOT</version>
	<packaging>war</packaging>
	<properties>
		<java-version>11</java-version>
		<org.springframework-version>5.2.5.RELEASE</org.springframework-version>
		<org.aspectj-version>1.6.10</org.aspectj-version>
		<org.slf4j-version>1.6.6</org.slf4j-version>
	</properties>
	<dependencies>
		<!-- Spring -->
		<dependency>
			<groupId>org.springframework</groupId>
			<artifactId>spring-context</artifactId>
			<version>${org.springframework-version}</version>
			<exclusions>
				<!-- Exclude Commons Logging in favor of SLF4j -->
				<exclusion>
					<groupId>commons-logging</groupId>
					<artifactId>commons-logging</artifactId>
				</exclusion>
			</exclusions>
		</dependency>
		<dependency>
			<groupId>org.springframework</groupId>
			<artifactId>spring-webmvc</artifactId>
			<version>${org.springframework-version}</version>
		</dependency>

		<!-- AspectJ -->
		<dependency>
			<groupId>org.aspectj</groupId>
			<artifactId>aspectjrt</artifactId>
			<version>${org.aspectj-version}</version>
		</dependency>

		<!-- Logging -->
		<dependency>
			<groupId>org.slf4j</groupId>
			<artifactId>slf4j-api</artifactId>
			<version>${org.slf4j-version}</version>
		</dependency>
		<dependency>
			<groupId>org.slf4j</groupId>
			<artifactId>jcl-over-slf4j</artifactId>
			<version>${org.slf4j-version}</version>
			<scope>runtime</scope>
		</dependency>
		<dependency>
			<groupId>org.slf4j</groupId>
			<artifactId>slf4j-log4j12</artifactId>
			<version>${org.slf4j-version}</version>
			<scope>runtime</scope>
		</dependency>
		<dependency>
			<groupId>log4j</groupId>
			<artifactId>log4j</artifactId>
			<version>1.2.15</version>
			<exclusions>
				<exclusion>
					<groupId>javax.mail</groupId>
					<artifactId>mail</artifactId>
				</exclusion>
				<exclusion>
					<groupId>javax.jms</groupId>
					<artifactId>jms</artifactId>
				</exclusion>
				<exclusion>
					<groupId>com.sun.jdmk</groupId>
					<artifactId>jmxtools</artifactId>
				</exclusion>
				<exclusion>
					<groupId>com.sun.jmx</groupId>
					<artifactId>jmxri</artifactId>
				</exclusion>
			</exclusions>
			<scope>runtime</scope>
		</dependency>

		<!-- @Inject -->
		<dependency>
			<groupId>javax.inject</groupId>
			<artifactId>javax.inject</artifactId>
			<version>1</version>
		</dependency>

		<!-- Servlet -->
		<dependency>
			<groupId>javax.servlet</groupId>
			<artifactId>servlet-api</artifactId>
			<version>2.5</version>
			<scope>provided</scope>
		</dependency>
		<dependency>
			<groupId>javax.servlet.jsp</groupId>
			<artifactId>jsp-api</artifactId>
			<version>2.1</version>
			<scope>provided</scope>
		</dependency>
		<dependency>
			<groupId>javax.servlet</groupId>
			<artifactId>jstl</artifactId>
			<version>1.2</version>
		</dependency>

		<!-- Test -->
		<dependency>
			<groupId>junit</groupId>
			<artifactId>junit</artifactId>
			<version>4.7</version>
			<scope>test</scope>
		</dependency>
	</dependencies>
	<build>
		<plugins>
			<plugin>
				<artifactId>maven-compiler-plugin</artifactId>
				<version>3.8.1</version>
				<configuration>
					<release>11</release>
				</configuration>
			</plugin>
			<plugin>
				<artifactId>maven-war-plugin</artifactId>
				<version>3.2.3</version>
			</plugin>
		</plugins>
	</build>
</project>
이어서 생성된 pom.xml 파일에 스프링 관련 의존성을 추가합니다.
(위 pom.xml 파일의 내용은 Spring MVC Project 템플릿으로 생성했을 때 기본 pom.xml 파일을 참고하였습니다.)
해당 의존성들을 추가하고 pom.xml 파일을 저장 시 프로젝트 하위 'Maven Dependencies'에 추가한 라이브러리들이 있는 것을 확인할 수 있습니다.

의존성까지 추가가 되었다면 이어서 '프로젝트 우클릭' -> 'Maven' -> 'Update Project...' 과정을 진행합니다.
업데이트가 정상적으로 진행되면 프로젝트 아이콘이 'J' -> 'S'로 바뀌고 'Spring Elements'라는 것이 추가되면서 프로젝트가 스프링 프로젝트로 바뀌는 것을 확인할 수 있습니다.

web.xml, root-context.xml, servlet-context.xml 파일 생성

스프링 프로젝트에서 xml 파일은 애플리케이션 컨텍스트를 설정하는 데 사용되거나, 웹 애플리케이션 구성을 지정하는 데 사용되는데요.
'web.xml', 'root-context.xml', 'servlet-context.xml' 파일에 대한 역할과 차이점은 포스팅 맨 하단에 링크되어 있으니 궁금하신 경우 참고하시면 될 것 같습니다.
<?xml version="1.0" encoding="UTF-8"?>
<web-app version="2.5" xmlns="http://java.sun.com/xml/ns/javaee"
	xmlns:xsi="http://www.w3.org/2001/XMLSchema-instance"
	xsi:schemaLocation="http://Java.sun.com/xml/ns/javaee https://java.sun.com/xml/ns/javaee/web-app_2_5.xsd">

	<!-- The definition of the Root Spring Container shared by all Servlets and Filters -->
	<context-param>
		<param-name>contextConfigLocation</param-name>
		<param-value>/WEB-INF/spring/root-context.xml</param-value>
	</context-param>

	<!-- Creates the Spring Container shared by all Servlets and Filters -->
	<listener>
		<listener-class>org.springframework.web.context.ContextLoaderListener</listener-class>
	</listener>

	<!-- Processes application requests -->
	<servlet>
		<servlet-name>appServlet</servlet-name>
		<servlet-class>org.springframework.web.servlet.DispatcherServlet</servlet-class>
		<init-param>
			<param-name>contextConfigLocation</param-name>
			<param-value>/WEB-INF/spring/appServlet/servlet-context.xml</param-value>
		</init-param>
		<load-on-startup>1</load-on-startup>
	</servlet>

	<servlet-mapping>
		<servlet-name>appServlet</servlet-name>
		<url-pattern>/</url-pattern>
	</servlet-mapping>

	<filter>
		<filter-name>encodingFilter</filter-name>
		<filter-class>org.springframework.web.filter.CharacterEncodingFilter</filter-class>
		<init-param>
			<param-name>encoding</param-name>
			<param-value>UTF-8</param-value>
		</init-param>
		<init-param>
			<param-name>forceEncoding</param-name>
			<param-value>true</param-value>
		</init-param>
	</filter>
	<filter-mapping>
		<filter-name>encodingFilter</filter-name>
		<url-pattern>/*</url-pattern>
	</filter-mapping>

</web-app>
(web.xml)
'/src/main/webapp/WEB-INF/' 경로에 위 내용과 같은 'web.xml' 파일을 생성합니다.
(web.xml 파일 내용을 보면 이어서 생성할 root-context.xml, servlet-context.xml 파일을 참조하고 있습니다.)
'web.xml' 파일의 경우 정석적인 방법으로는 '프로젝트 우클릭' -> 'Java EE Tools' -> 'Generate Deployment Descriptor Stup'을 통해 생성할 수 있습니다.
<?xml version="1.0" encoding="UTF-8"?>
<beans xmlns="http://www.springframework.org/schema/beans"
	xmlns:xsi="http://www.w3.org/2001/XMLSchema-instance"
	xmlns:tx="http://www.springframework.org/schema/tx"
	xmlns:mybatis-spring="http://mybatis.org/schema/mybatis-spring"
	xsi:schemaLocation="http://mybatis.org/schema/mybatis-spring http://mybatis.org/schema/mybatis-spring-1.2.xsd
	http://www.springframework.org/schema/beans https://www.springframework.org/schema/beans/spring-beans.xsd
	http://www.springframework.org/schema/tx http://www.springframework.org/schema/tx/spring-tx-3.0.xsd">

	<!-- Root Context: defines shared resources visible to all other web components -->

</beans>
(root-context.xml)
다음으로 '/src/main/webapp/WEB-INF/spring/' 경로에 위 내용과 같은 'root-context.xml' 파일을 생성합니다.
해당 파일 역시 정석적인 방법으로는 'xml 파일을 생성할 폴더 우클릭' -> 'New' -> 'Other...' -> 'Spring Bean Configuration File'을 통해 생성할 수 있습니다.
<?xml version="1.0" encoding="UTF-8"?>
<beans:beans xmlns="http://www.springframework.org/schema/mvc"
	xmlns:xsi="http://www.w3.org/2001/XMLSchema-instance"
	xmlns:tx="http://www.springframework.org/schema/tx"
	xmlns:beans="http://www.springframework.org/schema/beans"
	xmlns:context="http://www.springframework.org/schema/context"
	xsi:schemaLocation="http://www.springframework.org/schema/mvc https://www.springframework.org/schema/mvc/spring-mvc.xsd
		http://www.springframework.org/schema/beans https://www.springframework.org/schema/beans/spring-beans.xsd
		http://www.springframework.org/schema/context https://www.springframework.org/schema/context/spring-context.xsd
		http://www.springframework.org/schema/tx http://www.springframework.org/schema/tx/spring-tx-3.0.xsd">

	<!-- DispatcherServlet Context: defines this servlet's request-processing infrastructure -->

	<!-- Enables the Spring MVC @Controller programming model -->
	<annotation-driven />

	<!-- Handles HTTP GET requests for /resources/** by efficiently serving up static resources in the ${webappRoot}/resources directory -->
	<resources mapping="/resources/**" location="/resources/" />

	<!-- Resolves views selected for rendering by @Controllers to .jsp resources in the /WEB-INF/views directory -->
	<beans:bean class="org.springframework.web.servlet.view.InternalResourceViewResolver">
		<beans:property name="prefix" value="/WEB-INF/views/" />
		<beans:property name="suffix" value=".jsp" />
	</beans:bean>

</beans:beans>
(servlet-context.xml)
마지막으로 '/src/main/webapp/WEB-INF/spring/appServlet/' 경로에 다음 코드와 같은 'servlet-context.xml' 파일을 생성해 줍니다.
여기까지가 이클립스 환경에서 'Spring MVC Project' 템플릿을 수동으로 구성하는 방법입니다.
내용 중 잘못된 부분이나 궁금하신 부분은 댓글 남겨주시면 되며, 실제 프로젝트 코드의 경우 아래 github 주소를 참고하시면 됩니다.
감사합니다.
< 관련 참고 자료 >
< github 링크 >